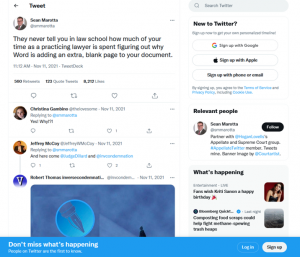
Just a few minutes ago, I received post message on Linked-In that had originally appeared on Twitter, which read:
“They never tell you in law school how much of your time as a practicing lawyer is spent figuring out why Word is adding an extra, blank page to your document.” —Sean Marotta
You can read on and/or you can also watch the video version of this tutorial. Keep in mind that there a few tips in the video that are not in this tutorial, and a few tips in this tutorial that are not in the video. So, I recommend you cover both.
That post, interesting enough, led me to create a new section on my website: Tips & Tricks. Oh yeah, we all have been there, a program acting up or doing something that just doesn’t make any sense at all. Often times, it is our own lack of knowledge of that particular program that causes these types of problems, or just bad programming altogether in the foundation of that application. It’s like “what where they thinking” when they put that software together. Worse yet is when years and even decades have passed and you still see the same glitch in the program, from one version to another, which is the case of Microsoft Word.
 The key to his type of problems is sharing, YES—sharing the knowledge and wisdom that we all have accumulated through out the years, for all of us—at some point, need a hand with something that’s making us age at light speed. Today—in our very first post, we are going to solve that pesky extra blank page problem that usually comes at the end of a Microsoft Word document, and that we don’t know why—and better yet, don know how to get rid of it.
For this brief tutorial you can download the sample word document I put together, which we will be using during this demonstration, or you can use your own troubled document. I recommend you save a copy of your document before doing so.
Often times when content has gone over a page’s limit (in length), Word adds a new page at the end of the document. It may add a blank page or add an orphan text line over that new page. Before we solve this, let’s understand why it happens.
First, let’s make it very clear that this should [almost] never happen, unless you intentionally introduce blank spaces to deliberately create that new page; Microsoft should know better. Most of the times when you copy and paste text from other sources, invisible characters are then introduced into your document. Remember—or learn, that a space is a character in your document, albeit and invisible one. This particularly happens when you copy text from a website or other programs that contain your text or even other word documents. Copying text from the web will likely bring formatting characters that will affect your document’s layout. Often times it will be obvious as this text will probably be oversized and of a different font than what you are using in your document. This may or may not happen, and you have to be aware of invisible characters that are the result of CSS and and/or HTML formatting.
One safe way to avoid introducing unwanted formatting and characters when copying text from external sources such as websites is to copy that text to your clipboard (CTRL+C), then paste it (CTRL+V) to a simple text editor such as Notepad, THEN copy it to your word document. This will avoid bringing unwanted formatting and the text will take on the style of your word document. Avoid copying from other advanced editors such as WordPad, Polaris Office, Google docs, etc. as these will introduce special characters that will definitively affect your layout and formatting.
Please note that adding more text will always affect your layouts regardless, but we are talking about special characters, invisible—and even visible, that will compete with your formatting settings.
Extra spaces can also happen when you just type your text and you can inadvertently hit the space bar or your ENTER keys and introduce those characters. You probably won’t notice any of that until you reach the edge of your last page in your Word document. Regardless of the reasons, you just want to fix it because it is very annoying. So let’s grab the bull by the horns.
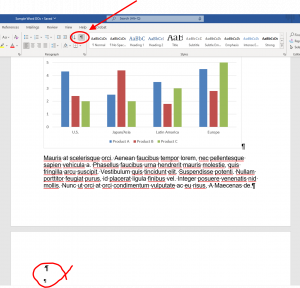 The easier way to identify the issue is to activate your paragraph button ¶, usually located under help menu. Your set up may be different if your toolbar has been customized. As you can see from this image, the paragraph button will display a ¶ symbol at the end of each paragraph, including where those paragraphs sitting on a blank space or blank page. Looking towards the bottom of this image, you can actually see two ¶ symbols, one on two different lines. That means my document has two extra blank paragraphs, one introduced during copy and past of the Lorem Ipsum text an the other by an ENTER key pressing. And you ca actually see that each ¶ symbol is different size, because they are, the first ¶ has a period [.] in front of it. Actually, both symbols are different font and size. So, to fix this all you have to do is bring your mouse cursor the end of the last paragraph symbol and left-click, then hit the BACK SPACE key a few times, one for each paragraph and the period and that will get rid of the extra page!
Sometimes you don’t have extra blank spaces, but you have other invisible characters, like padding and line paragraph spacing that pushes word to bring an extra blank page. And I call them characters because I don’t what else to call them, as activating the ¶ will not show any extra symbols to identify, yet it will give\ us some hint of the problem, if you pay careful attention. In this case, most likely you’ll get a new page with trailing text from your last paragraph. This in itself is not an issue with the program or something you did wrong, but rather that you need to be aware of your document styling works. This includes font type, size, line and line, paragraph spacing, capitalization and even italicization, and other type of formatting such as bold text. Each time you apply any of this formatting to your text it will unequivocally affect the flow and layout of your document, thus opening the door for that unwanted pesky blank page. You just need to be aware of it.
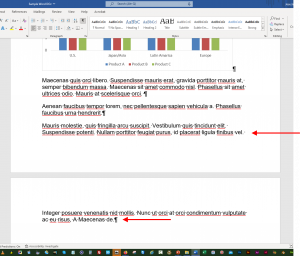 Looking at this third image you, you see some trailing text coming from your last paragraph on the previous page. If you pay careful attention at the last paragraph on page 1, it does not have a ¶ symbol. That is because that symbol is placed at the end of the paragraph, which happens at the top of page 2. So essentially, the paragraph doesn’t end on page one, but rather on page two. And I know you want that paragraph to fit on the first page and just delete the extra page. This happens quite a lot when formatting a résumé, for example. We can fix this multiple ways.
- We can adjust the font size for the body of our text.
- Change the Font Size
- Adjust height and spacing
Assuming you don’t have paragraph headers with different sizes (large title text), then you can RIGHT-CLICK and choose select all. This will select everything in the document, including images and charts. Then you just have change the font size like you would normally do using the font size drop-down box in your main menu. If you have paragraph headers with larger text, then you would either change the entire text of the document, and then go and change those headers separate or vice versa. Once yo understand that, the commendation is to change the text in small decrements. For instance, if your body text is size 12pt, then you might want to start with something like 11.95pt, or 11.88pt, 11.5pt, etc. until all text fits in one page, and the blank page disappears.
You can change your entire documents font tape. Each font will has its own spacing attributes, some will work, and some will not, you just have to keep playing with. Now, you probably won’t want that solution and is unlikely and that you would actually do that because that can bring other nightmares to your document.
Adjusting the line height, paragraph and letter and letter spacing will most likely solve your issue as well, without having to adjust the text size of your document. I must say that from here on it gets a bit more advanced and it can be somewhat intimidating for people with basic formatting skills in Word. But if you are not afraid, hop on.
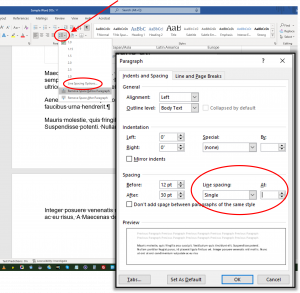 Following the same principle, select all (CTRL+A) to select your entire text. You can actually just select the last two paragraphs if you want, but for consistency purposes I like to apply the same formatting to all paragraphs in my document. So, to access the paragraph formatting tools, go and click on the Line and Paragraph Spacing button, to the left of the bucket tool (shading) and click on Line Spacing Options. Once there, right around the middle of the box, you can see Spacing (Before and After). You can see that my After paragraph spacing is 30pts for the, which is quite a lot. My Before paragraph spacing is 12, which is not awful. But +36+12 is 42pts of spacing in between paragraph is a lot. Sure, in reality I exaggerated the last couple of paragraph spacing for demonstration purposes. What I like to do, as a rule of thumb, is always set all my Before spacing to zero, and just work on the After paragraph spacing. So, I set it to zero and my After spacing to 11pts and that brought the entire document to single page and the spacing in between paragraphs still looks good.
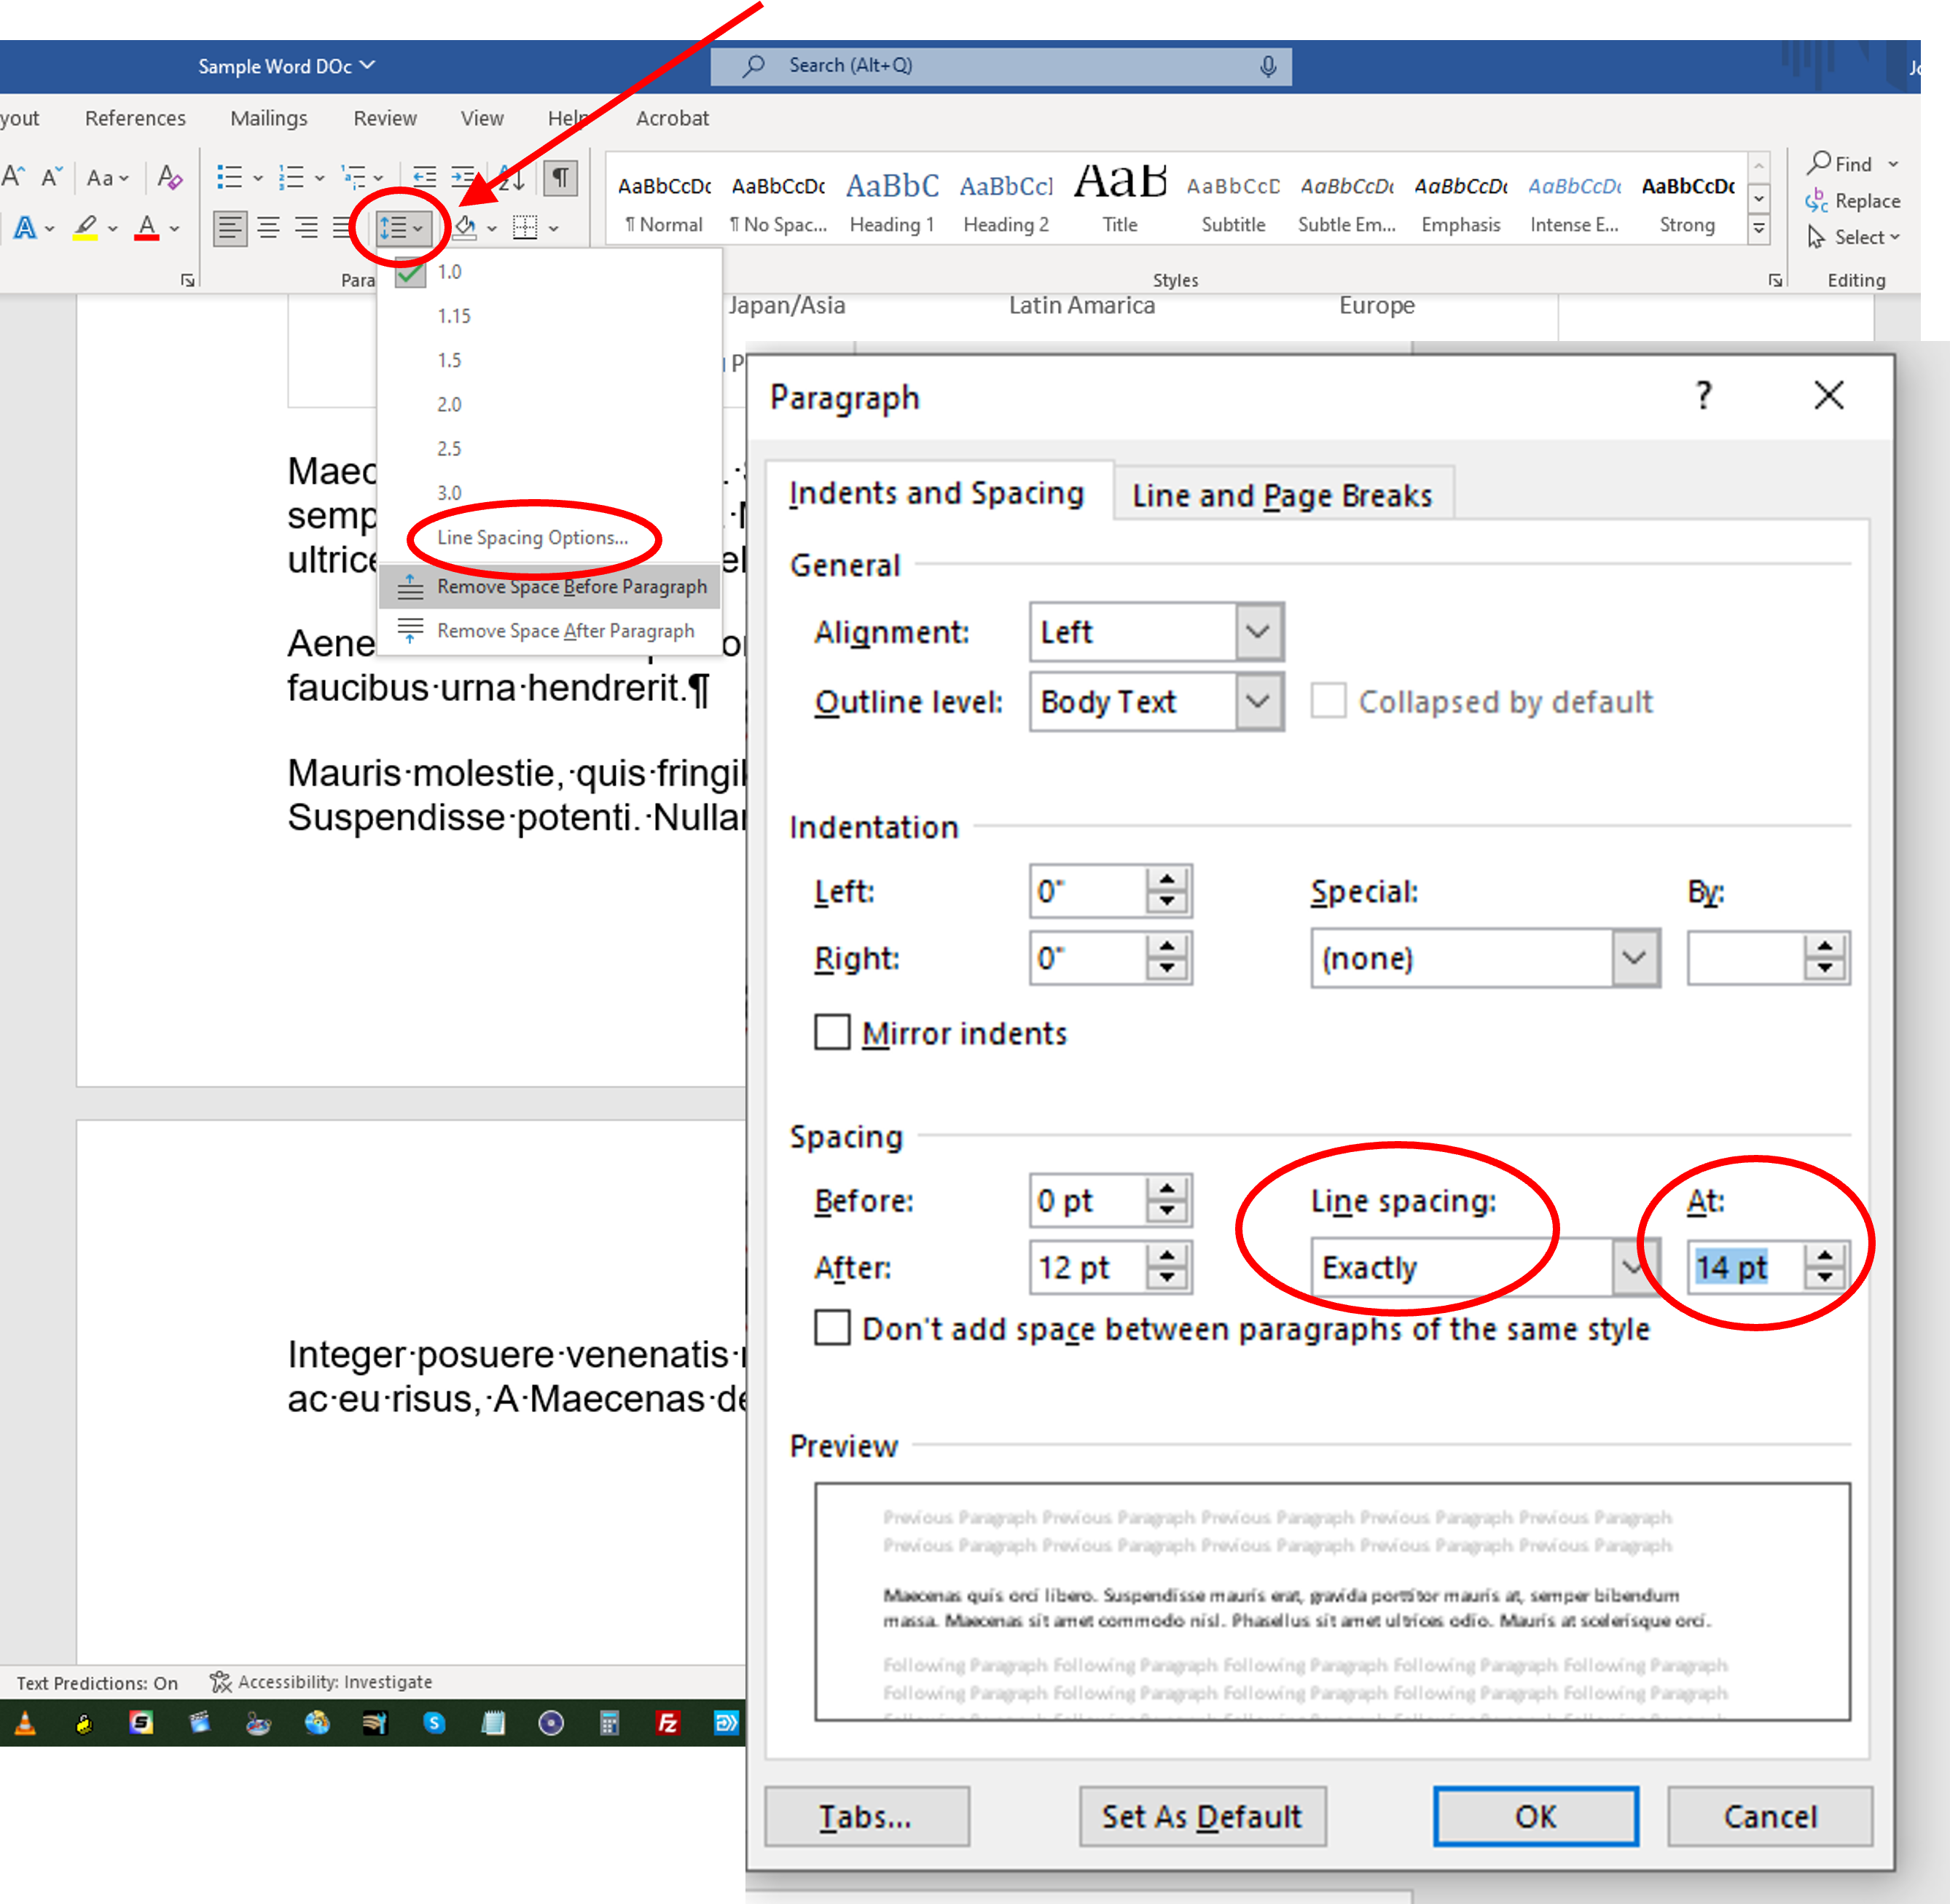 I did an undo (CTRL+Z) so I can test the next formatting option. Going back to Line Spacing Options, we have Line Spacing, next to spacing. In other applications this is called Line-height, which is a better description to it. This will not affect paragraph spacing, but rather the line height of each line of text within that paragraph. By default single is selected. Since I do have a Image and Bar Graph in my document, you’ll have to be more careful here and exception is to be made. If you are in Line Spacing Options, hit the ESCAPE key on your keyboard to exit this menu. Using your mouse, just select the last 3 paragraphs of the document. These are the last three paragraphs, right below the chart. The point is not to select the chart since changing the light height of where your chart sits will render unwanted results and your chart will disappear from the document. OK, for these last three paragraphs you will want to make this less than a single space of line height. So, with your three paragraphs selected, and on the Line Spacing section, click on the drop-down arrow button and select Exactly, and enter the value (14ppts) where it says At. Click OK, and you’ll see that the document fits neatly on one page.
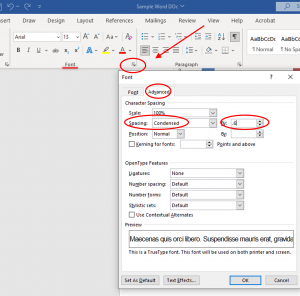 Next is the font’s character spacing, which essentially makes your text tighter (or expanded) to affect your entire spacing (if you select all text) and or a specific portion, like we did with the last three paragraphs of the document in the last step. For this example, and I went and undid (CTRL+Z) my previous formatting to start over. I selected all text again (CTRL+A). So, go ahead and
- click the little arrow at the bottom right corner of the Font Menu.
- Select the Advanced Tab
- Click drop down arrow bottom on Spacing and select Condensed
- Change the value to .6
- Press OK
As you can see, the content fits on one single page. If you fill your text is a bit too tight, resort to the other methods here presented. This tutorial seems to be a bit too long, but it’s really not. As you noticed, I just went and showed you different ways of solving the same problem. There will be times the X method might not work, and now you have different ways to accomplish your task at hand. I’ll put this whole thing in a video soon to make things even easier. Leave me you comments bellow and if you have any suggestion of another annoying behavior on a productivity software like PowerPoint, word, etc., please let me know and I’ll do my best point you in the right direction.
With all that said, enjoy your clean document without that pesky extra page!
Blessings for all of you.


